

Master the Art of False Eyelashes: Your Ultimate Guide to Stunning Eye Makeup
Hey, beauty lovers! If you're looking to elevate your eye makeup game, false eyelashes are an absolute game-changer. They can instantly add drama, depth, and allure to your eyes, making them the perfect accessory for any occasion, from a casual day out to a glamorous evening event. In this blog, we'll dive into everything you need to know about false eyelashes—with visual guides—to help you apply and maintain them like a pro. Let’s get started!
📌 Choosing the Perfect False Eyelashes
1. Consider Your Eye Shape
Different lash styles flatter different eye shapes.
- Round eyes: Opt for lashes longer at the outer corners to elongate. [Insert image: Side-by-side comparison of round eyes with natural vs. outer-lengthening lashes]
- Almond eyes: Versatile! Wispy lashes add softness. [Insert image: Almond eyes with wispy lash style]
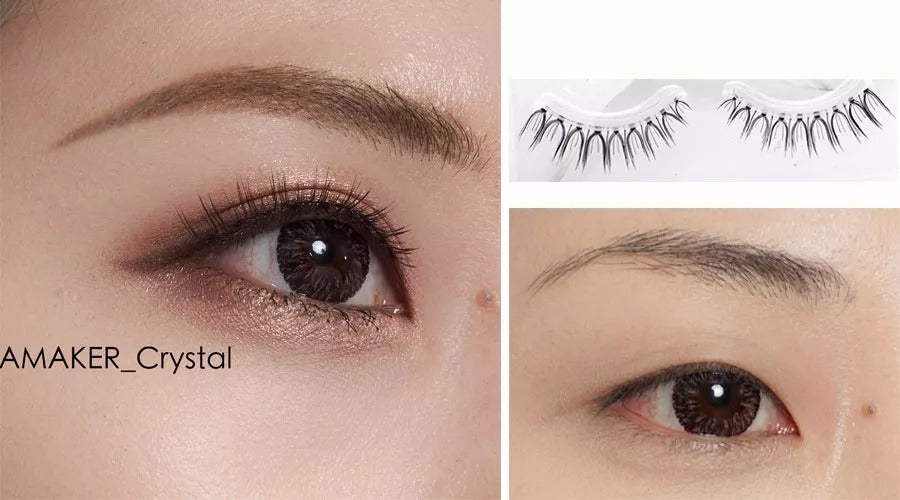
- Hooded eyes: Shorter inner lashes + longer outer lashes open up the eye. [Insert image: Hooded eye diagram with lash length guide]
2. Determine the Occasion
- Daytime/natural: Lightweight, short-to-medium length lashes (e.g., 10-12mm). [Insert image: Model wearing natural false lashes in daylight]
- Nighttime/dramatic: Voluminous, curled, or glitter lashes (e.g., 14-16mm). [Insert image: Model with bold, sparkly lashes for evening]
3. Quality Matters
Invest in cruelty-free synthetic or mink lashes (check for softness and flexibility). [Insert image: Close-up of high-quality vs. low-quality lash bands]
✨ Preparing for Application
Tools You Need
- Tweezers
- Lash adhesive (latex-free/hypoallergenic)
- Scissors
- Mascara
- Eyelash curler[Insert image: Flatlay of lash tools arranged neatly]
Prep Your Natural Lashes
- Curl natural lashes with a curler. [Insert image: Step-by-step curler demonstration]
- Apply one coat of mascara (let dry fully).
🛠️ Step-by-Step Application Guide
1. Trim the Lashes
- Hold lashes against your eye; trim excess from the outer edge. [Insert image: Scissors trimming lash band diagram]
- Pro tip: Leave 1-2mm gap at the inner corner for a natural look.
2. Apply Adhesive
- Squeeze adhesive onto a palette; brush a thin layer along the band. [Insert image: Close-up of adhesive application]
- Wait 30 seconds for it to become tacky (sticky to the touch).
3. Place the Lashes
- Use tweezers to position the middle first, then press inner/outer corners. [Insert image: Tweezers placing lash in the center of the eye]
- Fill gaps with eyeliner. [Insert image: Eyeliner pen filling gaps between lashes]
4. Blend and Set
- Swipe mascara through natural + false lashes. [Insert image: Mascara wand brushing combined lashes]
- Gently re-curl with a curler (avoid pinching).
🔧 Removing and Maintaining False Eyelashes
1. Gentle Removal
- Soak a cotton pad in micellar water; hold for 10 seconds to dissolve adhesive. [Insert image: Cotton pad on closed eye during removal]
- Slide lashes off from outer to inner corner.
2. Clean and Store
- Gently peel off leftover adhesive with tweezers.
- Wash with mild soap + water; air-dry on the original tray. [Insert image: Cleaning process with soap and lash tray]
- Store in a cool, dry place to preserve shape.
💡 Pro Tips for Long-Lasting Wear
- Avoid oil-based products: They break down adhesive.
- Test adhesive first: Do a patch test if you have sensitive skin.
- Reuse wisely: High-quality lashes can last 5-10 uses with proper care.
Ready to transform your look? Whether you’re going for a subtle flutter or full-on glamour, false lashes are your secret weapon. Share your favorite lash style in the comments below, and don’t forget to tag us in your lash looks! 🌟
Stay tuned for more beauty hacks—subscribe to our newsletter for exclusive tips!
Share
Leave a comment
All comments are moderated before being published.
This site is protected by hCaptcha and the hCaptcha Privacy Policy and Terms of Service apply.